

In an earlier post, I described the considerations that go into creating a training dataset for Computer Vision, including how to set up labels and classes. There’s a lot of detail to consider because only by defining good classes will you achieve useful results in the end. This post is intended to be a relatively simple and straightforward tutorial on how to actually create, i.e. annotate, training data for computer vision, such as in the MS-COCO or YOLO metadata format. This data can later be used to train or fine-tune computer vision algorithms for your research.
I’m currently writing an article on this annotation project that delves into the considerations that went into my alchemical dataset, which I’ll be using as an example in this blog post: You can download HAB Wolfenbüttel’s alchemy image data using my scraping script if you want to test things out for yourself but don’t have your own dataset. The script to download these images from the portal on the webpage is part of the data acquisition process that I didn’t cover in this blog post (see How to create a ground truth data set for computer vision using Humanities data for a different example with a data selection and acquisition process).
The context for this blogpost
When I first started exploring computer vision, I didn’t know what kind of data to provide an algorithm for fine-tuning a dataset. I learned this during my computer vision project about detecting alchemical laboratory apparatus, a collaboration with the Leipzig Computational Humanities Group, which is still partially ongoing. In fact, creating such a dataset is really quite simple, but if you don’t know how to do it or what tools to use, it can be daunting. This is why I’m here to help.
This summer, I had the honor of holding a one-month NFDI4Memory FAIR Data Fellowship with Herzog August Bibliothek Wolfenbüttel. The purpose for creating this dataset was to enlarge my alchemical objects training data by adding sources from the digital library of Wolfenbüttel. As part of this fellowship, I agreed to write a blog post so others can learn how to achieve this themselves.
I was also encouraged by Marcus Baumgarten from Herzog August Bibliothek Wolfenbüttel, who used to read this blog back when I posted more frequently. He mentioned how he appreciated that this blog often provided practical tutorials that don’t find space in other publication venues. Scholarly articles often just present the results without explaining the basics you need to replicate a project yourself or apply a project’s lessons learned to your own data.
This has inspired me to revive the blog a bit because I now realize that, in fact, I have learned a lot about computer vision and machine learning algorithms over the last years. I’ve been busy teaching and creating other didactic resources (which Idiscuss in later blog posts such as this and this). But recently, I didn’t know what to say on this blog, or I felt like I had nothing new to teach, which is funny because I’ve been teaching more than ever. But now, I feel positive about reviving the blog to share new tutorials, maybe especially focus on machine learning topics because they’re relevant and people are interested in them. I’m considering following up with a post on how to create an OCR training dataset. It seems simple, but there are many considerations. When teaching this to students, they often don’t find this as intuitive as I would assume. Maybe I’ll even talk more about things like data feminism and data ethics.
That’s the plan for the future, but now let’s get to the actual content of this blog post: how to create a computer vision training dataset using the platform Supervisely.
You want to fine-tune or train Computer Vision data – but where does one even begin?
There are different options for how to create your training data. First of all, you need to know in what data format your algorithm uses.
In my case, I want to get MS COCO (website, paper and Youtube video explaining the data format, basically a JSON standard) and YOLO data (Medium post, YOLO paper).
Basically, MS COCO just a standard format for JSON files. If you know what a JSON file looks like, this won’t be new to you. It’s nested, somewhat like XML, but also a bit different. If you’re familiar with XML, you can think of it this way: XML is a metalanguage and TEI is one dialect or standard created using XML. Similarly, MS COCO is to JSON what TEI is to XML.
As for the YOLO format:
The YOLO format assigns each image in the dataset a text file (for example, .txt), where each line corresponds to an object in the image. The class index and normalized bounding box coordinates (center_x, center_y, width, height) are contained in each line. The bounding box coordinates are proportional to the image’s width and height (Medium).
Fortunately, there is an online platform that allows practical ways of image annotation whose results you can later download as both those formats: Supervisely.
I have to admit that I haven’t tried anything else so far but I also don’t need to. The free version of Supervisely has all I need. But here are some more examples of annotation tools for your reference. Or try the Graz (F)ast (R)ectangle (A)nnotation (T)ool created in the context of the ERC DiDip project.
Setting up your project: coming up with good classes
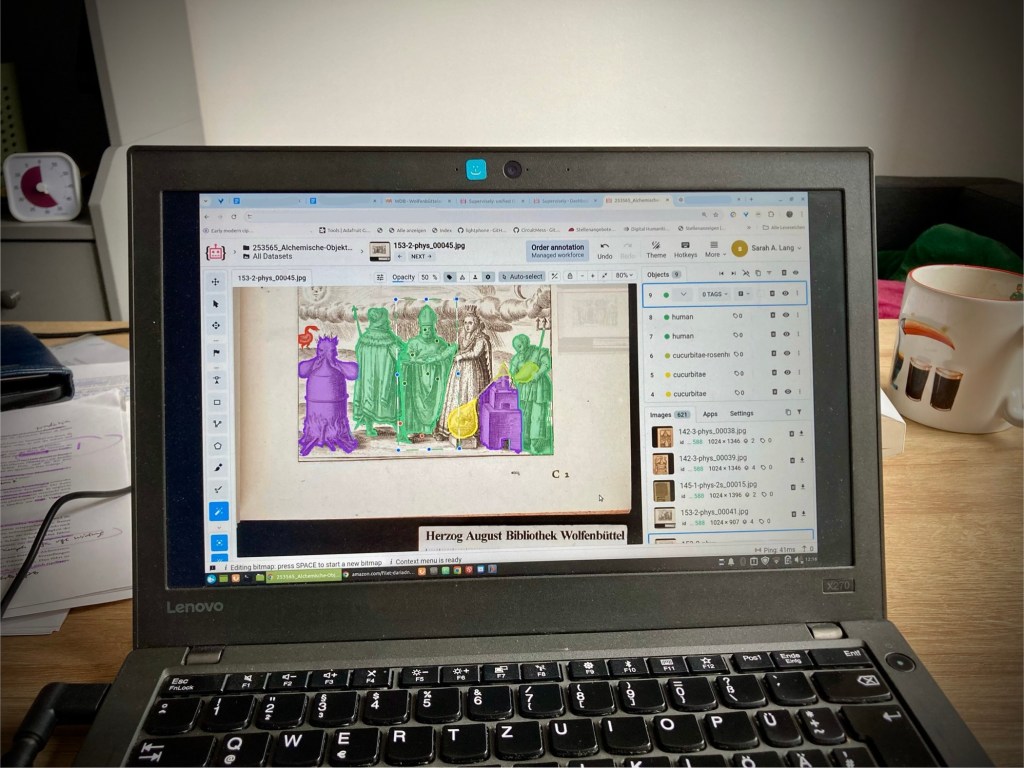
Annotating your images in Supervisely is actually really quite simple once you know how to do it. The most important thing is to come up with useful classes before you start annotating. However, as I will likely discuss in my scholarly article about annotation, these classes will never be perfect. On the one hand, you want them to be as simple as possible with as few classes as possible, but the fewer classes you have, the less detail you can capture. For some topics, especially when there isn’t an existing classification, or even when you’re reusing an existing one like I did, you might realize that the classification doesn’t work well for images (in general or your particular ones).
Let me explain what I mean on one example. In the classification I’m using, there are two classes (among others) that are visually quite similar but distinct in the classification: Ampullae (for flask or bottle-like devices) and Cucurbitae (more rounded, named after pumpkins). However, in reality, when I find an alchemical image with a device that isn’t a vessel and isn’t labeled in the book itself (some are labeled since the books I look at function like instructional manuals), it’s often extremely hard to distinguish them. In some cases it’s clear but in others it isn’t at all. Sometimes, a device might be called a bottle-like device in certain contexts and a Cucurbit in another, which isn’t something you can actually *see* in the image—you have to know from the context.


If I could redo my classification scheme, I might not distinguish between these two types. Both classes have subtypes in this classification, and some subtypes are visually distinct, making them easier to categorize. I included them by naming the labels, for example, Cucurbitae-Ambix, so you can later recognize that it’s part of the same class but the algorithm can have distinct classes. However, there is a general category of devices where it’s hard to tell whether it’s a flask-like or pumpkin-shaped device. In this case, I should have created a broader class encompassing both, like “vessels in general,” so that when I’m unsure, I can categorize it as such without specifying further.
I also have images with humans and furnaces. For the furnaces, I decided not to make any distinctions, even though there are different types. It turns out that in my dataset, furnaces are frequent enough that it would actually have made sense in this case to include subcategories. However, initially, I didn’t have a feel for the data as I do now after the annotation is done. I think this is common: you’ll be wiser after the annotation than before, but by then, you’ll have already annotated so many objects based on your initial considerations that it might be too late to go back. The process will always feel imperfect, and that’s normal. Depending on your use case, you might choose to redo it after gaining more knowledge, but this depends on the level of granularity and how perfect the final results need to be.
Setting up the actual account and Supervisely project
Above were theoretical considerations, so let’s move on to the actual practical part, which is really quite simple. You create a Supervisely account (mine is linked with my GitHub), and then create a project. In that project, you’ll create your classes and assign them a color. In my experience, it’s important that the colors are easily distinguishable, though you can change the color assignment later if needed. If you find that the colors are too similar, try to find better distinctions. I had about 12 classes, and it was already a bit challenging to find distinct colors for each. If you have many more, it will be an even bigger problem.
Be warned: even when I did my best to annotate the data and checked the annotations a few times, I still found some ridiculous mistakes in the final result in the end. I was quite shocked as I had considered my annotation work to be of high quality as I had done it carefully. If you work with an editor like this, try to visualize your annotations later—for example, by making a list of all the image snippets labeled with a certain name—and check for mistakes that need to be corrected. If you’re feeding these into an algorithm, you don’t want to confuse it. I was shocked by the number of mistakes I hade made, even though I was being very careful. I guess at some point you just miss things, lose focus or simply change something accidentally. Selecting colours where mistakes visually stand out might minimize this risk (but probably won’t eliminate it entirely).
Annotation using the magic wand tool (“Smart Tool”)
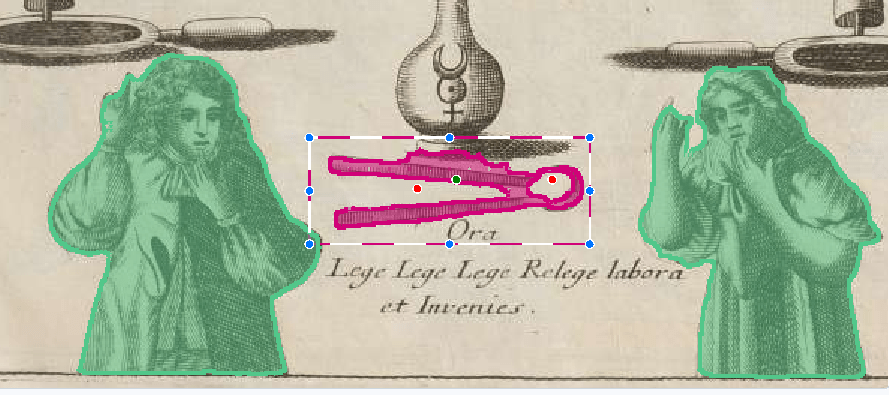
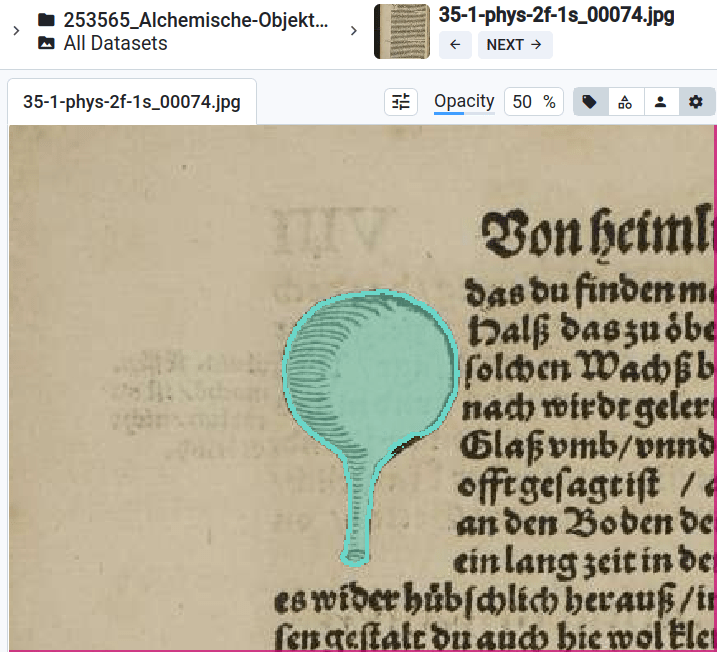
Once you have uploaded your images into a folder and set up the classes, you start by selecting the magic wand tool (called the “smart tool” in Supervisely). You begin by drawing a bounding box around the object, then use smart points—green for areas that are part of the object, red for areas that are not. This will create pixel-level annotations, meaning it will draw a line around the actual object within the bounding box. In some cases, you only need to annotate the rectangles or bounding boxes, but in this case, the data stores both the bounding box and the pixel-level segmentation.
Don’t worry too much about the data outputs now—you’ll have all the data available in the end. If you’re the person doing the annotation, you might not be the one training the algorithm, so you don’t necessarily need to worry about the these details at this stage.
Using Segment Anything 2 as a model behind the Smart Tool
Another interesting feature of Supervisely’s annotation editor is that you have multiple segmentation models at your disposal for the smart tool, and recently, they’ve added Segment Anything 2 as a model. I’ll briefly review how that’s been working for me.
Ultimately, I think it’s better than the old tool—it’s quite “intelligent”. However, there are certain cases with my objects, especially those that are very alchemical and likely not represented in the model’s modern training data (which probably consists of modern photos), where it struggles.
With these objects, sometimes it can be so stubborn that no matter how many smart points you use to teach it what to do, it still won’t get it right. In these cases, I revert to the old model.
Otherwise, I like the new Segment Anything model; it’s really smart, especially with detecting furnaces that often look like houses in alchemical drawings, and with detecting humans. Here, it requires far fewer smart points to identify a human shape, probably because it was trained extensively on human figures.
In terms of using this on early modern data, it’s fairly effective. I find that the Segment Anything model is much better with depth perception, but this also means that in sketch-like drawings, which are common in my alchemical texts, the lack of depth can sometimes make it harder for the model to recognize shapes, especially if it gets stubborn. However, it can annotate objects in the background of an image that are already pixelated, and it still detects the borders of the object, almost like a human would. So, in that sense, it’s more intelligent, but also more stubborn than the old model.
Overall, using Segment Anything 2 has saved me time. You can switch to this model by clicking the little “ID” button below the Magic Wand Smart Annotation tool. There’s a tutorial if that’s something you’re interested in, but Supervisely also sends its users plenty of emails with tutorials and new features, so you’ll have no shortage of resources.
Nailing the annotation process: How to label images in Supervisely
Regarding the annotation process, it’s relevant to note that you press space to confirm that your object is done, which is familiar from many image processing applications and then you click to draw a new bounding box (if applicable) or move on to the next image to be annotated. You use a normal click to set a green point, indicating that this area should be included in the image, and you hold Shift and click to set a red point, indicating that this area should not be included in the annotation. Once you’re done, press space, and that’s it. You can click back into your annotation by hovering over the image or selecting the annotation in the side bar to the right in case you made a mistake (such as selected the wrong class and want to fix that).
I have keyboard shortcuts set for my annotation classes, which was initially confusing, but I have now set them in a way that’s intuitive—ideally, using the first letter of the class or something else that’s easy to remember. Once you have these shortcuts, you don’t need to click around, as clicking around takes a lot of time. I realized this during older annotation projects, such as when I was at the German Historical Institute in Paris in 2017, where I annotated around 1,200 regests from medieval charters. I realized then that setting keyboard shortcuts to switch between annotation types made the process much faster.
Initially, you need to learn these shortcuts, so you’ll likely take longer with the first few examples, and of course, you need to set up the system. But when annotating a lot of data, don’t click around—clicking around costs a lot of time. (Even when editing in TEI, try to navigate with the keyboard as much as possible. This will definitely save you a lot of time in the long run.)
Additionally, what I learned in that 2017 project, which may not apply as much to image annotation but to speeding up annotation in general, is to annotate similar items in one go. For instance, when annotating images, if there are multiple furnaces or humans, I’ll switch to the appropriate annotation type, annotate all the humans, and then move on to the next object. This approach doesn’t save as much time with images, but in the case of my 1,200 regests, I would, for example, first mark the beginning and end of the regests for 200 regests, then go through the entire document setting start and end markers, then do all the paragraph markings, and then all the place names. Not having to change between annotation categories made the process much faster. Also, when working with text, if you don’t need to read the text to determine, for example, whether it’s a place name or a human name, don’t read the text. This will drastically increase your annotation time. If you don’t need to read it for research or to better understand your data, don’t get distracted by it.
Once you’re done with your annotations, go through them again, because, as I mentioned, I was shocked at how many mistakes I made or how many accidental mislabelings occurred. I do think you get more routine the longer you do it, so I probably made more mistakes initially.
How long does it take to annotate X amount of images and how to be as efficient as possible?
Since we’ve been talking about efficiency, you might wonder how long it actually takes to annotate a certain number of pages or objects. Specifically, how long does it take to annotate 500 objects?
First of all, in my Supervisely setup described here, the time required for annoating one page or object can vary significantly depending on the complexity of the objects and the tool’s performance (remember how it sometimes gets stubborn in the segmentation process). When an object is isolated and there’s no background, the smart tool can immediately snap into place. In these cases, you don’t need many smart points, which is important because they are limited in the free account each day. When the tool works quickly and efficiently, it might take only 10 seconds to annotate a single object on a page.
However, the time needed increases with complexity. For instance, if you have five objects on a page that each snap into place easily, it will take about five times as long as a page with just one object. But if the setup involves composite objects—common in many of the image examples I work with—it can take much longer. These composite setups often involve smaller, more pixelated objects, which require more effort to get the smart tool to recognize what you want to annotate. As I mentioned before, Segment Anything 2 is better in some of these cases, but it can also be more stubborn. For example, the older annotation tool often took a long time to annotate humans, but with Segment Anything, this issue is gone. The tool is highly intelligent when it comes to recognizing human shapes, likely because it was trained on images containing humans. It also handles images with depth better, such as when one object is behind another. However, in some cases, it’s still too complicated, and the tool may not comply, resulting in wasted time. But in other cases, it’s shockingly good at recognizing even objects that are partially hidden.
When dealing with composite setups, it’s harder to tell the segmentation tool what’s part of the object you want to annotate and what isn’t. Sometimes the tool works well, but other times it gets stubborn or confused. Composite setups usually involve many more annotations, which compounds the time required. It often takes more than proportionately longer to annotate a page with multiple complex objects compared to a page with one simple, easy-to-annotate object.
Another factor that affects the time is uncertainty about what you’re annotating, especially when working with historical objects. If you’re not sure how to annotate something, you may need to think about it for a moment. With my objects, I sometimes want to read the accompanying text to make sure I understand what it is. However, as you may know from my post on how to speed up annotation, the golden rule is: don’t read things, don’t get distracted, don’t play with your data if you want to annotate fast. While it’s natural for humanities scholars to find their data fascinating, spending time reading the text during annotation can dramatically increase the time needed. In some cases, it may still be necessary to avoid incorrect annotations, but try to minimize it as much as possible.
Once you’re done annotating…
Remember, once the annotation process is done, that’s only the beginning of the project. You’ll want to train an algorithm, see how it performs, and possibly revise your annotations. This is a very iterative process (like all modelling is by definition), and you’re likely to revisit your annotations multiple times, as I’ve found in my project. One interesting aspect is whether the algorithm’s performance actually improves with more annotations. Initially, we hoped that a few-shot approach would work well, but that’s not how it turned out. This is discussed in more detail in our publication, in case you want to learn more. But just know that once you’ve completed the annotations, that’s only the starting point.
To export your annotations for algorithm training, click on the folder or project in Supervisely and use the export or download options. You can export in various formats, including MS-COCO or YOLO (You Only Look Once), which are quite common.
Conclusion
Phew, that was a long post! That’s it for today.
Thanks to NFDI4Memory for funding this project, and to Daniela Schulz for her great support—it was really nice meeting again. And, of course, a special thanks to Marcus for motivating me to get back to maintaining this blog.
Buy me coffee!
If my content has helped you, donate 3€ to buy me coffee. Thanks a lot, I appreciate it!
€3.00

One thought on “How to create your own fine-tuning or training dataset for computer vision using Supervisely”