
In today’s tutorial I will show how to reproduce a beautiful example of historical print using XeLaTeX. The inspiration for this came from my amazement with the Bible de Genève, one of the most beautiful typesetting examples with LaTeX (to be found in the LaTeX beautiful typesetting showcase: LaTeX showcase). I thought I had to explain how a simple, non-perfect version of something like this can be done. Because, actually, something similar is not that difficult to create if you’re willing to do it less perfectly.
I tagged this post ‘beginner-friendly’ and ‘advanced’ at the same time because, frankly, I wasn’t sure which one was true. This is probably not your ‘3min to LaTeX’ beginner’s tutorial (which can be found [here]) but it looks pretty cool and is not that difficult either.
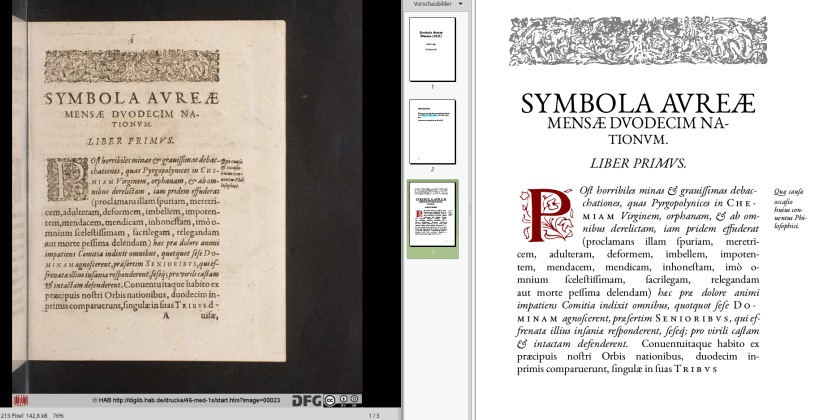
This post also serves as a teaser because this is only the base, really, for the actual tutorial (to follow soon, hopefully): Going from TEI-XML data to a PDF more or less imitating the historical print. And all that done automatically using an XSLT transformation for the whole glory of 600 pages of Michael Maier’s Symbola Aureae Mensae (1617). I’ll keep you posted, but for now, this is what the LaTeX part of the game looks like.
This is the Overleaf link to my document which you can view or reuse to your own liking.
The tutorial uses XeLaTeX. For now, suffice it to say that XeLaTeX is the way to go if you want to include your own fonts and if typesetting them is really important. I will explain why or why not and when to best use XeLaTeX in another subsequent post.
But I have also included some if-else constructs to check whether you’re compiling with XeLaTeX or just normal pdflatex because if you don’t have XeLaTeX available, the long s will not be displayed and you will get an error for every unicode character not present in the regular pdflatex font. Also, the microtyping, which I use very sparely for the letter spacing. Please be aware that I have not yet gotten to familiarize myself thouroughly with the microtype package or typographical best practises, so if in question – rather take somebody else’s advice on the specificities. But seeing as this tutorial is only meant as a teaser, I am not going to explain every detail anyway.
First things first
I got my data the Herzog August Bibliothek Wolfenbüttels alchemy portal where they have a full text of Michael Maier’s Symbola Aureae Mensae here. There I accessed the TEI data (a bit difficult to find here ) from which I subsequently extracted the first page of Liber Primus. All the typesetting used was present in the markup in the form of elements. For your information, this is the part of the TEI-XML this is based on (XML is broken and, seemingly, unrepairably so. Please check out the XML in the link from above).
SYMBOLA AVREÆ
MENSÆ DVODECIM NA-
TIONVM.
LIBER PRIMVS.
POſt horribiles minas & grauiſſimas debac-
Quæ cauſa
& occaſio
huius con-
uentus Phi-
loſophici.
chationes, quas Pyrgopolynices in Che-
miam Virginem, orphanam, & ab om-
nibus derelictam, iam pridem effuderat
(proclamans illam ſpuriam, meretri-
cem, adulteram, deformem, imbellem, impoten-
tem, mendacem, mendicam, inhoneſtam, imò o-
mnium ſceleſtiſſimam, ſacrilegam, relegandam
aut morte peſſima delendam) hæc præ dolore animi
impatiens Comitia indixit omnibus, quotquot ſeſe Do-
minam agnoſcerent, præſertim Senioribvs, qui ef-
frenatæ illius inſaniæ reſponderent, ſeſeq́; pro virili caſtam
& intactam defenderent. Conuentuitaque habito ex
præcipuis noſtri Orbis nationibus, duodecim in-
primis comparuerunt, ſingulæ in ſuas Tribvs
d
To sum it all up, we largely have 4 elements to account for:
A head element which uses a bigger fontsize, spacing, italic and bold. More generally, we will do hard-coded linebreaks so it will be easier to maintain the page layout of the original without having to micro-adjust the LaTeX. Then, we have the highlights, indicating where we need to adjust font styles, weights, variants like caps and also, spacing between letters and also to some degree, between words, to maintain the balance.
Ah, and of course, don’t forget to LaTeX-ify the ampersands! (XMLs & entity ( & has to be changed to LaTeX’s \& )
Setting up the document
In the code examples to follow, I only pasted the things I explain in here. For the full document see the Overleaf link. I suspect, however, that I included some packages which wouldn’t be needed. So probably don’t take this as an example from which to learn good LaTeX style… Here goes:
\documentclass[paper=a6,11pt]{scrbook}

\usepackage{iftex}

%---------------------------- font settings
\usepackage[utf8]{inputenc}
\usepackage[english,latin.classic]{babel}

\usepackage[T1]{fontenc}

\usepackage{lmodern}
\usepackage{ebgaramond}
\usepackage{lettrine}
First, I decided to use the scrbook documentclass with a6 paper and and 11pt font, so I didn’t have to do too much rescaling from the historical book to a4 for this quick tutorial. The iftex package allows me to check if the user is using XeLaTeX or pdflatex like I explained in the intro. The next improtant step is the ebgaramond font which provides the beautiful historical font style ( Georg Duffners EB Garamond). This font is the reason we primarily need XeLaTeX for. It the PDF also turns out nicely with pdflatex but is more beautiful in detail if using XeLaTeX. Also, I wanted to include this to show to DH people how you can include unicode characters which aren’t readily found in other fonts but might be needed for setting historical print.
\usepackage[protrusion=false,final,letterspace=-100]{microtype}
\newcommand{\spacedtext}[1]{\ifXeTeX{\addfontfeature{LetterSpace=20}\scshape #1} \else \textls[170]{\scshape #1}\fi}
\newcommand{\longs}{\ifXeTeX ſ\else s\fi}

\input Zallman.fd
This piece is where the microtype package comes in. I researched this just enough to achieve the effect shown in the example. I am by no means an expert on this and hope I’m not teaching you something hugely incorrect. The settings here are an approximation to get as close as possible to the historical example by just eyeballing it. If this were done more exactly, you probably wouldn’t need to hard-code the linebreaks like I did. But I thought it was easier and safe with the knowledge in mind that I intend to automate this and am not willing to check for every single one of the 600+ pages of the historical print if the output is correct.
Also, below this I defined the \spacedtext and \longs commands where I check how LaTeX is being compiled. If XeLaTeX is used, the spaced text will be done differently from the pdflatex option because it will throw errors otherwise. The \longs command is something you might want to create for every unusual unicode character in another document. Using pdflatex the long s unicode character, for example (the most frequent among others) will be undefined, thus throwing an error and simply not displaying that s. This is why I want it replaced with our ‘normal s’ if using pdflatex, so I don’t end up with half of the characters missing and having to check manually for missing characters. For this one page example also, this saves you a lot of work with Maier’s text.
Lastly, the \input Zallman.fd imports the initials.
\phantom{ }

\begin{figure}[H]
\begin{tikzpicture}[fill opacity=0.5]
\hspace*{-0.5cm}\includegraphics[width=1.15\textwidth]{decoration-vector.png}
\end{tikzpicture}
\end{figure}
The heading and some unusual line breaking
So this is where the actual document starts. I use \phantom{ } to get some spacing at the top (yes, I am one for dirty solutions). Then I add a picture of the decorative element at the top of the original print. This was done using that part of the facsimile (from the same source at HAB Wolfenbüttel, indicated above). I did some image manipulation and vectorized it. Then I place it as a tikzpicture with a 50% opacity. Notice the meaninful naming as decoration-vector.png. 😀
\Centering
{\bfseries \textsc{{\Huge SYMBOLA AVREÆ} \linebreak {\Large MENSÆ DVODECIM NA-}\linebreak {\large TIONVM.}}}

{\large\textit{LIBER PRIMVS.}}

\medskip
Here comes the header. It is centered using ragged2e s \Centering, then I switch to boldface for the upper part of the heading, use small caps and select different sizes for the different lines. Notice how they are separated by \linebreak, not the \\ I would usually use to force linebreak. Try replacing all ‘linebreak’s with ‘newline’ and see how the inter-word spacing doesn’t work anymore. The different options for producing forced linebreaks have some subtle differences (see also the Overleaf tutorial here ).
\\, \newline and \hfill \break give more or less similar results for most use cases. Note however that \\ is redefined by some commands (like \centering) to achieve the desired behaviour whereas \newline won’t (resulting in undesired results, see explanation here ).
Usually, you don’t want to use \linebreak as it is considered somewhat of a ‘last resort command’ which usually produces ugly unwanted results (see Stackoverflow ). In our case however, ironically, this is exactly what we want: It will ensure that we get an even right margin by saying ‘break the line here and make the line end at the right margin’. This is totally what we want in this case. Usually, it probably wouldn’t be needed, but as mentioned above, I did not micro-correct all the word spacing options, etc. But we still want the result to look as much as the historical print as possible, so the ‘last resort command’ does the trick here.
The typesetting of the main text area
This is our last snippet here, explaining the rest of the principles at work in our mini-example of Michael Maier’s monumental Symbola Aureae Menase. If we wanted to typeset the whole book, we would need some more settings, of course, as he also has some more textual and typographical elements going on in these 600 pages of alchemical historiography. But let’s nor worry about that just yet:
\justify
\fontsize{9.5pt}{11pt}\selectfont

\renewcommand{\LettrineFontHook}{\usefont{U}{Zallman}{xl}{n}\color{red!50!black}}
\lettrine[lines=5,,loversize=-0.05, lraise=.05]{P}{}
\emph{O\longs t horribiles minas \& graui\longs \longs imas debac-}
\marginnote{\fontsize{6.5pt}{7pt}\selectfont\emph{Quæ cau\longs a} \linebreak \emph{occa\longs io} \linebreak \emph{huius con-} \linebreak \emph{uentus Phi-} \linebreak \emph{lo\longs ophici.} } \linebreak
\emph{chationes, quas Pyrgopolynices in} \spacedtext{Che-} \linebreak \spacedtext{miam} \emph{Virginem, orphanam, \& ab om- \linebreak nibus derelictam, iam pridem effuderat} \linebreak
(proclamans illam \longs puriam, meretri- \linebreak cem, adulteram, deformem, imbellem, impoten-
I use \justify to get the justification and set the font size manually using \fontsize{9.5pt}{11pt}\selectfont which again, could probably done more elegantly if I had taken the time to properly adjust the page, font and spacing settings. For this quick and dirty solution, however, this works just fine. The command sets the the font size with the first argument and the \baselineskip with the second one. Note that it is usually better to use the symbolic font sizes LaTeX provides (such as \large, see Stackoverflow ). But in this case, we want to be able to hard-code this the way we need it and don’t want LaTeX to exert its magical typesetting powers. Sorry LaTeX.
Usually the smybolic font size commands would guarantee a balance between font size and \baselineskip. Again, the ratio I inserted here is based on eyeballing only. But I think it works quite nicely here.
The initial
\renewcommand{\LettrineFontHook}{\usefont{U}{Zallman}{xl}{n}\color{red!50!black}}
\lettrine[lines=5,,loversize=-0.05, lraise=.05]{P}{} sets and displays the initial. You probably shouldn’t renew the command inside begin{document}. Well…
Lettrine uses the Zallman initials (see the LaTeX font catalogue initials section (at the bottom)). It sets the color to red!50!black, so it mixes red and black in a 1:1 ratio. Just red was too bright, I found. Note how I added this and there is no color in the original print. The \lettrine command sets the size of the initial to spanning 5 lines, downsizing it by 5% ( loversize=-0.05 ) and also raising it a little bit. Behind the raise is the ‘P’ the actual input the command takes, so the letter to be displayed as an initial.
The text
There follows some \emphed text to achieve an italic effect (maybe in this case, it would have been better to hard-code it as \textit seeing as the correct font style is also ‘hard-coded’ as the elements of the TEI-XML. Then, also note the frequent use of our \longs command. Already in the first line, this was totally worth the trouble. The \spacedtext{} macro created the spaced small caps using the microtype package which I didn’t explain in detail above. An explanation of this will follow in some subsequent post. For now, content yourself with playing around with it as provided.
That’s basically it, the only thing I didn’t explain yet is the margin note.
The margin note
\marginnote{\fontsize{6.5pt}{7pt}\selectfont\emph{Quæ cau\longs a} \linebreak \emph{occa\longs io} \linebreak \emph{huius con-} \linebreak \emph{uentus Phi-} \linebreak \emph{lo\longs ophici.} }
This basically creates a margin note. I manually redefines the fontsize like explained above. If we wanted to go beyond this example first page, we would probably include this resizing option as our default into the \marginnote command and also reset it so it always places the note on the respective outer margin of the page (in this example we only have this one note on the right side which is the standard option anyway, if we had a doublepage layout, we might want to reset some options). Note how you can use the \linebreaks inside the marginnote as well. Seeing as we have the information exactly where the lines should be broken from the TEI-XML, we might want to respect that.

So, that’s it for now and here’s what it looks like again.
Cheers!
Buy me coffee!
If my content has helped you, donate 3€ to buy me coffee. Thanks a lot, I appreciate it!
€3.00

how do I start a new section without \letterinefonthook
Please help
LikeLike