
Do you need to make a vector logo for your project but have no idea how? Do you want to beautify an academic poster with some visuals but you don’t really have skills in that department? This is the post for you.
The content of this post was a part of my old post Two basic image manipulation life-savers. I found that the title wasn’t exactly search engine optimized so people might not be able to find it. Really, one part of this post was about making a vector graphic, for example for creating a project logo, using some vectorizer apps and GIMP. It’s easy and requires hardly any previous knowledge, though having used GIMP before will probably help. The rest is just the old post from here on: “how to easily create a nice little vector graphic from a photo of some historical object or person.”
First things first
This might seem obvious, but make sure you only use images you actually have the right to use. Check explicitly, don’t just assume! Get written permisson, if it’s not 100% clear what your rights are. If you are supposed to take pictures for an event, most people now mention that pictures will be taken in the event invitation already and that by attending, you agree to have your picture taken. Check what practices are at your institution.
Secondly, I am not a graphic designer or anything and fully self-taught in this realm. These tips work well for me and might work for you too. But just to make sure: I’m not actually competent to teach anyone on this topic 😉
Vector graphic from photo
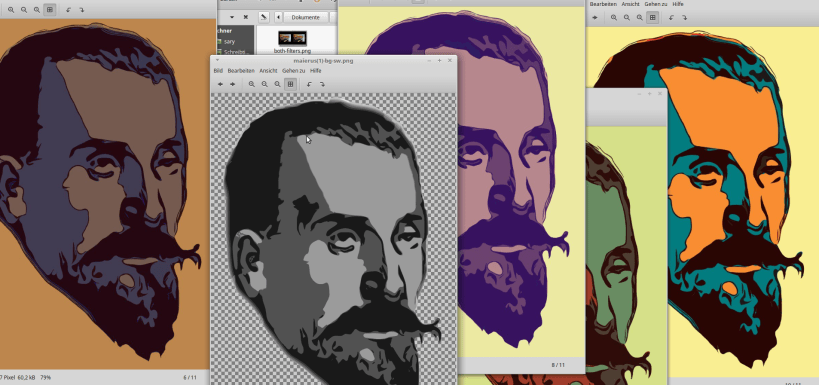
I want to give you a few tips on how to create a nice vector graphic from a historical photo. Vector graphics make for nice logos, for example. Adding one can be all the spicing up a simple template or poster needs. It’s an eye catcher. They take a while to make if you want a good one (a few hours), but can be done on a train ride or during a meeting 😉 and I’ve never regretted making one and people loved them. Even though I’m not a professional logo / graphic designer and my results are far from perfect.
How to go about it
- Scan very high quality if the image is from a book. Or take a high quality photo, reducing background elements if possible (will save lots of time later).
- Get rid of noise (Gaussian blur, 10px or something, try it).
- Then vectorize it, for example using Vectorizer.io: they will let you do quite enough if you sign up for a free account and disable your adblock. You can’t do very many images at the same time but since you’ll have other image manipulation taks to do in between, this will be just fine. Of if you’re pressed, use a trial account. Or do Vectorization.org. I also like the Imaengine app. But you can only save the results when you pay a few bucks for the full version (worth it though). In this case, save it high quality. But maybe also get back to Imaengine only after you’ve cleaned out background elements you don’t need to add final touches. Play around with reducing the number of colour or adding some blur. But reducing the number of colours basically is the main thing you want to do. Maybe start with the smallest possible number of colours and go back up until you think you got the “feel” of the original image back, but without the details. (For example, with just two colours, you’re likely to have lost the original “feel”.)
Then the work starts: Manually get rid of patchy sections as well as all the background in GIMP. It will look a lot better and way more professional if you just take the time to do this (even if it’s not perfectly done). This is where you can invest the 1-2 hours I mentioned this would take. As I said, I am by no means an expert but I feel that most image manipulation things just take a lot of time and effort – they aren’t necessarily difficult to do. So even a beginner can achieve an ok result if they’re just willing to put in the time.
Edit: For getting rid of the background, you could also use services like Remove.bg to speed things up, as was pointed out thankfully by the #TeXLaTeX community on Twitter. It works super well with many types of photos. However, with my early modern print thingy, it didn’t know what the foreground was supposed to be: “Please select an image with a somewhat clear distinction between foreground and background. For instance, try a photo of a person, product, animal, car or another object.”
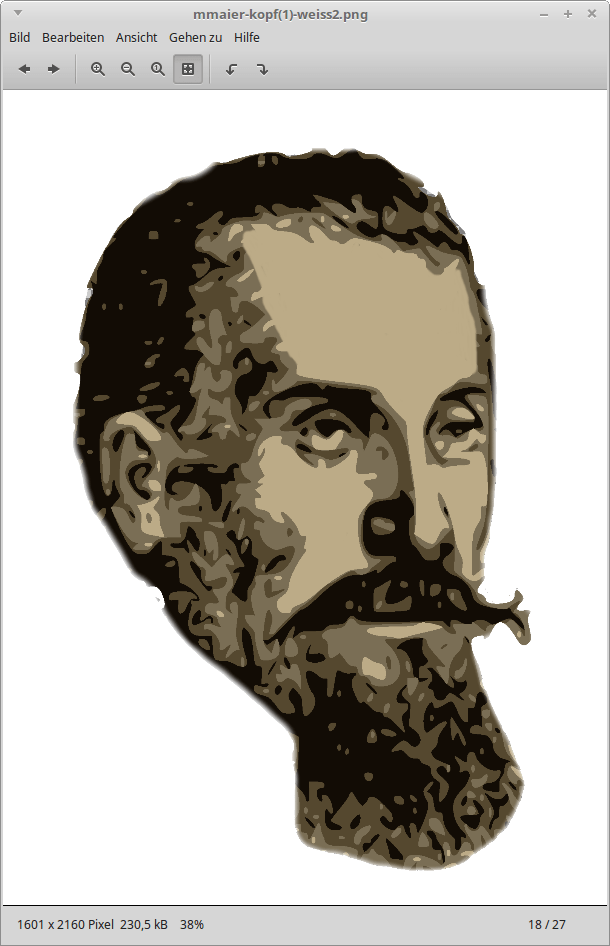
Manually drawing on the computer in an image manipulation program is not everybody’s thing an might take some getting used to. Many people will want to use a mouse for this. Don’t get discouraged by initial failures. It still is a question of practice and routine. You will, however, be able to get instantly better and more failsafe results if your base image is fairly big and you zoom in very closely. Start with baby steps. It will get easier once the most patchy areas are gone. Once you’re done, run it through the vectorizer once again to get rid of some of the small patchiness you might have overlooked or created while manually drawing around.
Delete the background. This can be done in multiple ways. If it’s all done in the same color, there is the option ‘color to transparency’ (or something like that). Else you might want to use the wand tool and click delete or the like. Save (=export) the result. Voilà, your vector graphic is done.

Some more tips
- To take into account: If the logo is supposed to be displayed very small, be sure to reduce a lot of detail. Always opt for 30% less detail than you think you need.
- Maybe make multiple logos or draw stuff on paper. Multiple quick sketches always yield better results than trying to get it perfect the first time. Fail fast and learn from your failures.
- Another win when using vectors is that you can output them as SVG or enlarge their size without things getting pixely. This might also be a reason you want to create a vector graphic in the first place.
GIMP shortcuts cheat sheet (learn some to significantly speed things up)
- O = get the color (click)
- P = switch to pencil
- CTRL + C: copy
- CTRL + V: past
- CTRL + SHIFT + V: paste as new image
- CTRL + SHIFT + E: export as (this is the ‘saving option’ in GIMP which will save the actual product, not the project itself – ‘save’ will save the project).
- CTRL+Z to undo
- paste (CTRL+V)
That’s it. Now edit away 😉
PS: In the old post,I also explained how you can amateurishly edit event photos using, for example, the GIMP retinex filter.
Buy me coffee!
If my content has helped you, donate 3€ to buy me coffee. Thanks a lot, I appreciate it!
€3.00

There is a great alternative to create professional vector graphics, logos and portraits. In some cases it’s more powerful than Adobe Illustrator, but it’s free…
https://gfkdsgn.wordpress.com/inkscape-vector-illustrations/
LikeLike