
Today I wanted to share a little quickstart tutorial for the Transkribus Software. Its purpose is Handwritten Text Recognition (HTR) which is something like OCR (Optical Character Recognition) for handwritten texts such as manuscripts. I, however, just use it as a general purpose OCR tool for historical texts as it works just great on early modern print if you have the right model for your font.
Transkribus: A Mini-Tutorial
As I said, I don’t use all of Transkribus’s functionalities, for me it’s just a tool to get a quick OCR / HTR transcription of early modern Latin and German print texts. That way, most of the little buttons are just distracting and Transkribus’s User Interface can be a bit intimidating for novice users. I use Transkribus for Linux. So let’s get going.
First, download and install Transkribus
I will not explain this here.
Always login in first
Then, the first thing you need to do: Log in! Always login in first and make sure your account name or email is displayed somewhere and the login is active. Otherwise you won’t be able to access ‘your collections’. If they are still displayed because your login just expired and you do something, you might be redirected and I’m not sure if data could be lost or something.
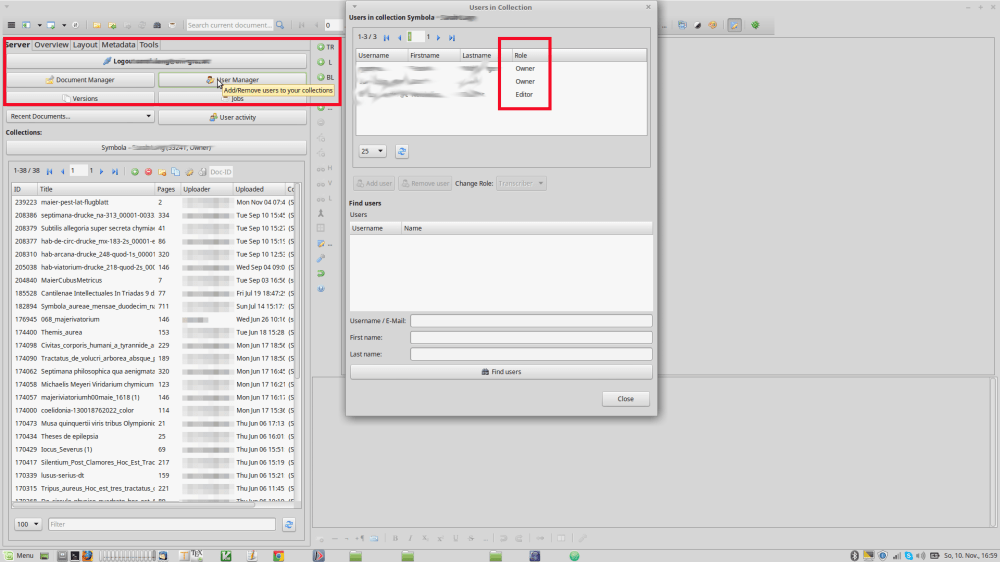
Go into a collection
Go into a collection. Everybody has access to some pre-installed collections for the purpose of teaching yourself Transkribus but you can also set up private collections from your account. This is where your work will happen. You can also share those with colleagues who also have a Transkribus account so you can work on a transcription collaboratively (In the “User Manager” > “Find user”).
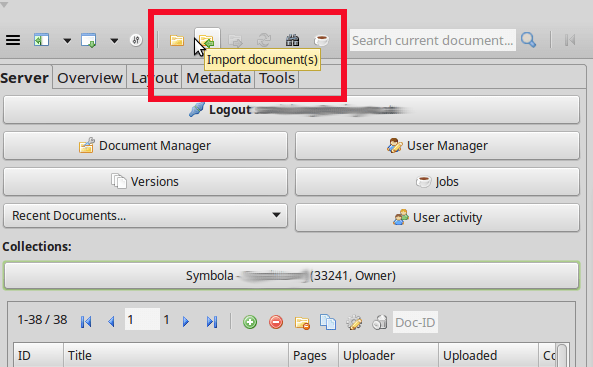
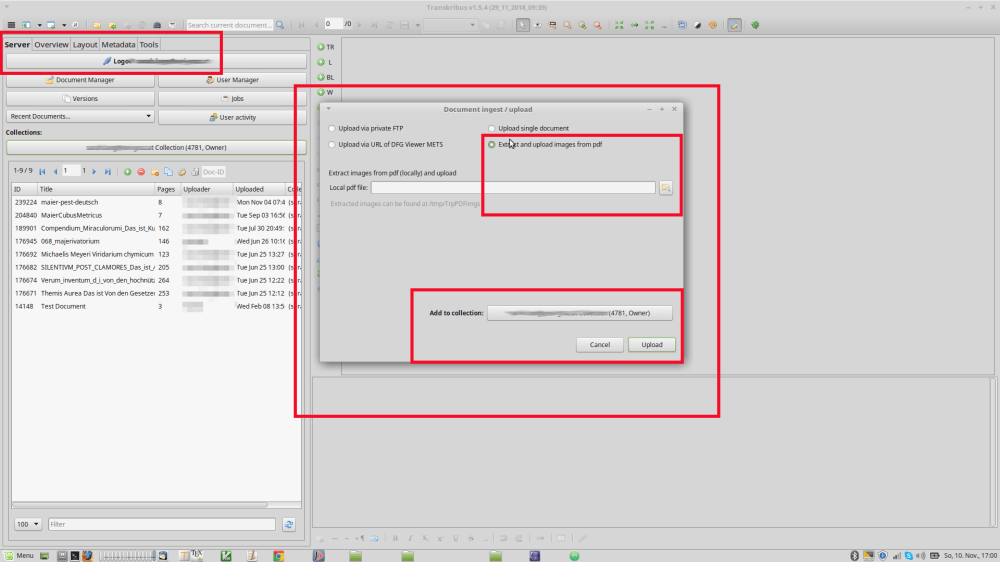
Import a document
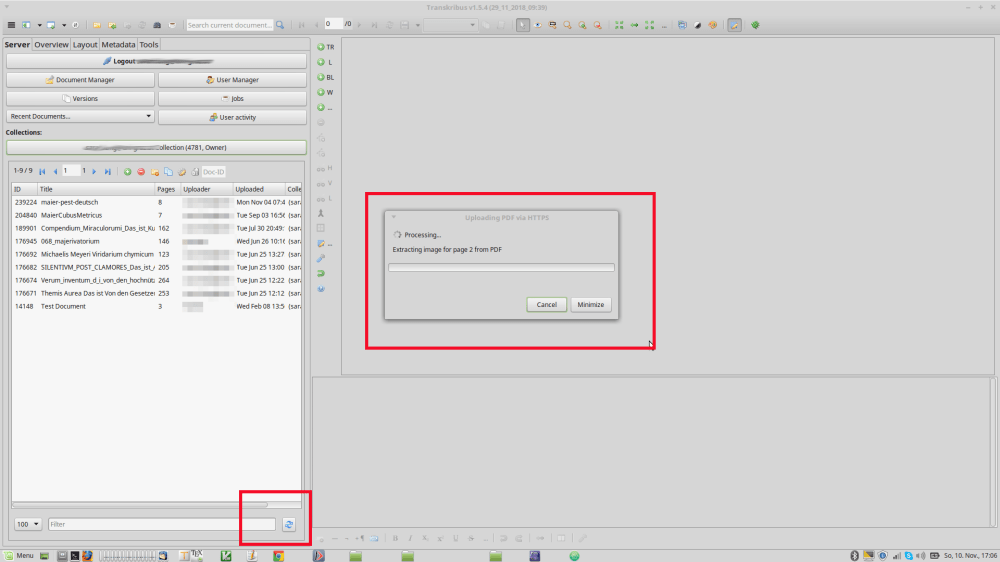
Import a document. The easiest way for me is to use a PDF (Option “Extract and upload images from PDF”). As you are probably aware, your results will get better with better input data. There are many books digitized by Google but try to get your data from another source if possible. For example the German digitization initiatives like VD-17 provide much better data. Before you do this step, again please be sure that you are in the right collection where the document is supposed to be ‘unpacked’ into. Choose the PDF from your file system. Run the process. While this process runs, Transkribus will “freeze”, click “Minimize” to be able to do something else during the upload. You will be prompted once it’s done.
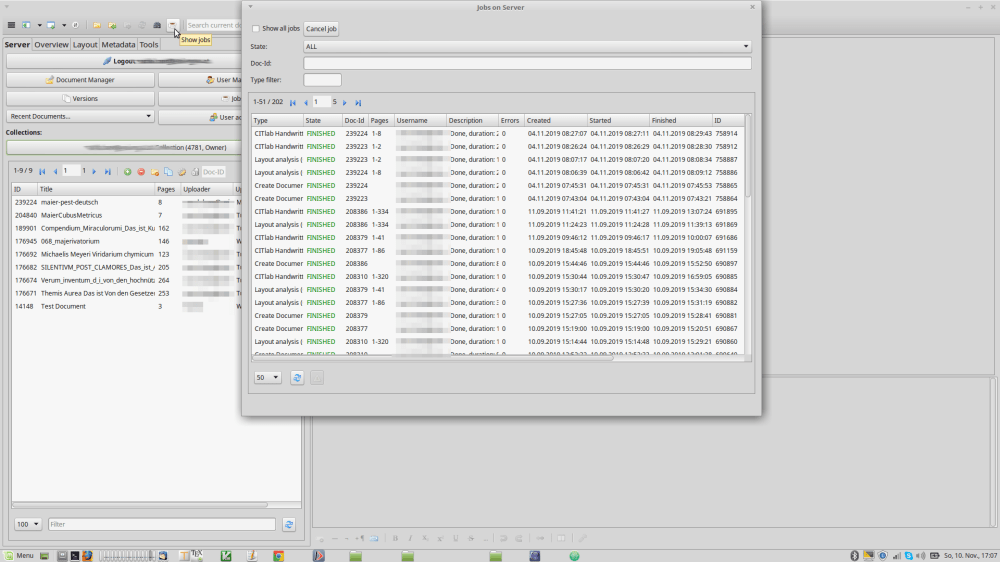
Explore the “Jobs” button
Meanwhile, you might want to explore the “Jobs” button or tab, denoted by a little cup of coffee. It contains a list of past and still running jobs. You can use this to check whether you’ve already done something, in case you’re a bit lost today. Or you can just use the cup of coffee as a prompt to go and get a cup of coffee. Once you’re back Transkribus will be done too. I ever only have three different types of jobs in this listing: 1. Create Document. 2. Layout Analysis and 3. CITlab HTR.
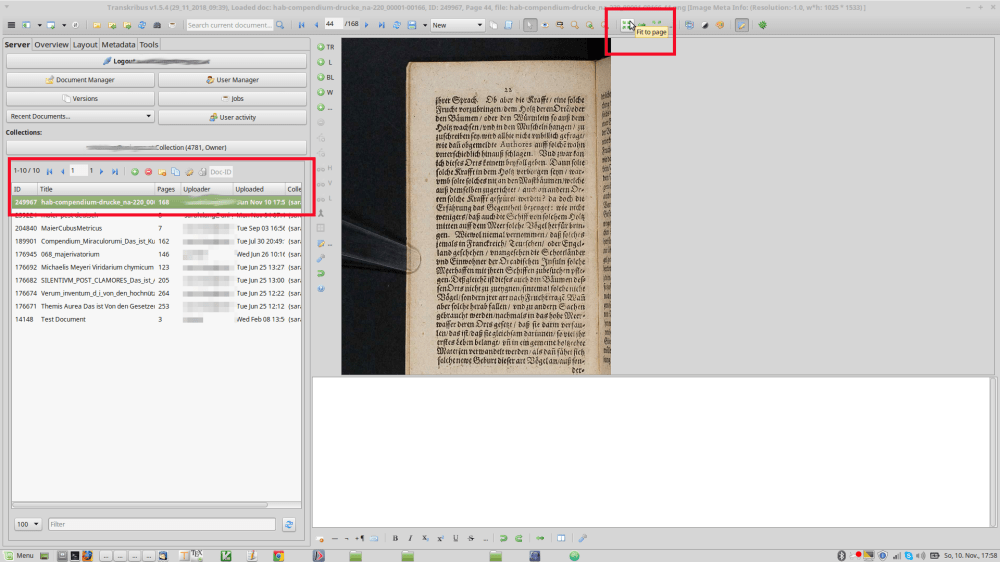
Refresh the collection
Refresh the collection if the document isn’t there yet. Once the document is uploaded, it might take a few minutes for it to show up in your collection and be accessible. To check whether it’s already there, you might want to make use of the refresh button. Display your uploaded pages by (double) clicking on them in the collection. It will “activate” it as a the current active document by printing the name in bold.
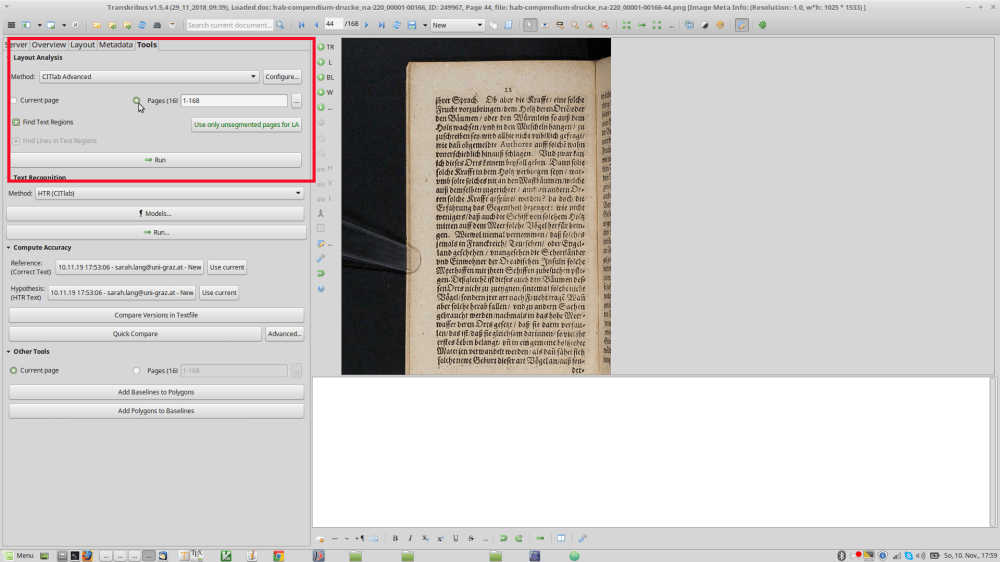
Tools tab: Start layout analysis
Then go to the “Tools” tab and start the layout analysis (the first option on top). It’s important that you don’t forget this step or confuse the order: The computer first needs to know where the lines are, then it can start to read the text. The layout analysis is precisely for that: finding the lines. Once this is done (you can go something else meanwhile or work on another text, check if it’s done using the jobs overview and return once everything’s ready), check out if it was really applied for all pages. You were probably prompted whether you wanted to do it ‘for this page only’ or for all pages or certain pages before the process started. I usually type an arbitrary number like 44 to make sure the page I jump to is not a frontmatter page. Usually, nothing goes wrong, but it might some times. My most frequent mistake is that I accidentally click ‘for one page’ when I really meant for it to do the whole book. Check if everything’s done because the following step, the text recognition, obviously will only work on pages whose layout has already been analyzed.
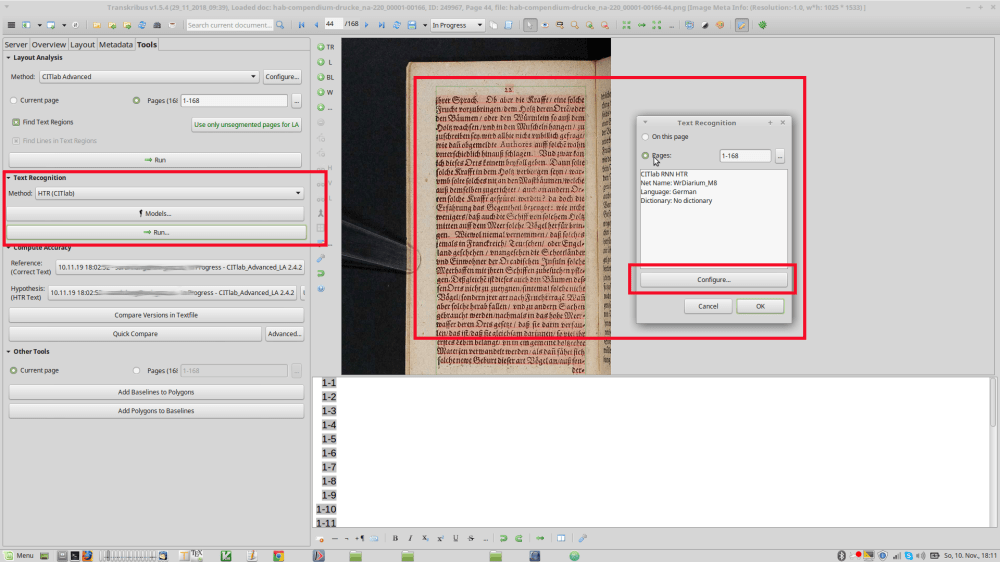
Where the magic happens: Text Recognition
Like before, you will get prompted whether you want to do all pages or just certain ones. Be sure to check the correct model to be used. And go. Once it’s done, check whether it was done for all pages.
Post-processing
You will need to clean up some stuff now (like for example with my data, ornaments will sometimes be read as characters resulting in garbage). My documents have only between 1-5 errors per page, with some of them just being missing whitespace because the print was placed very narrowly. I am happy with those results but according to your needs, you might need to correct those mistakes. Save your changes with CTRL+S or otherwise. Don’t forget to save them in any case (however, you will be prompted before leaving a page). Another thing to note: You get prompted whether you want to do or re-do a text recognition or text analysis because this will delete the previous one. So your (manual) changes will get lost. Decide on an acceptable model whose output you like, then start making manual changes. Don’t rerun the analysis after that.

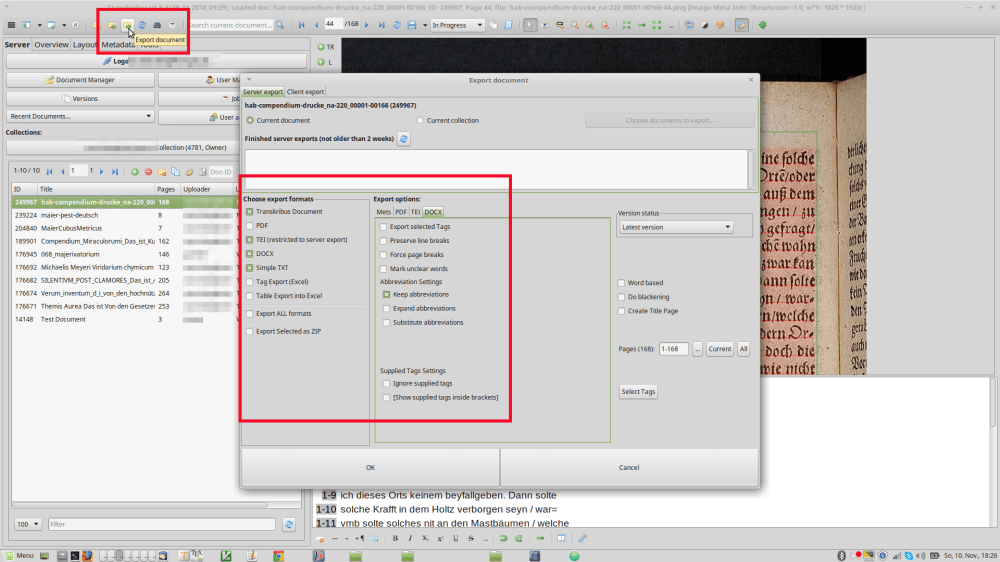
Getting the results: Export
Downloading the results: Now that you’re done, you will want your output, I guess. In order to get it, click on the “Export” button right beside the input button. There is a plethora of possible output formats (such as XML, Word, plain text, etc.). However, note that the XML output is PAGE-XML. They also offer TEI but the main information will be localizations of the lines on the page (lots of numbers!). You probably won’t need that. Anyhow, the requested output will be sent to your login email after a few minutes. That’s it 😉 Now go have fun with your data 😉

As a German example, I used the German translation of iatrochymist Michael Maier’s De volucri arborea, called Compendium Miraculorum, with the print coming from Herzog-August-Bibliothek Wolfenbüttel. The Latin text is Michael Maier’s Tripus Aureus. For the Latin example, the data also comes from the digital library of Herzog-August-Bibliothek Wolfenbüttel.
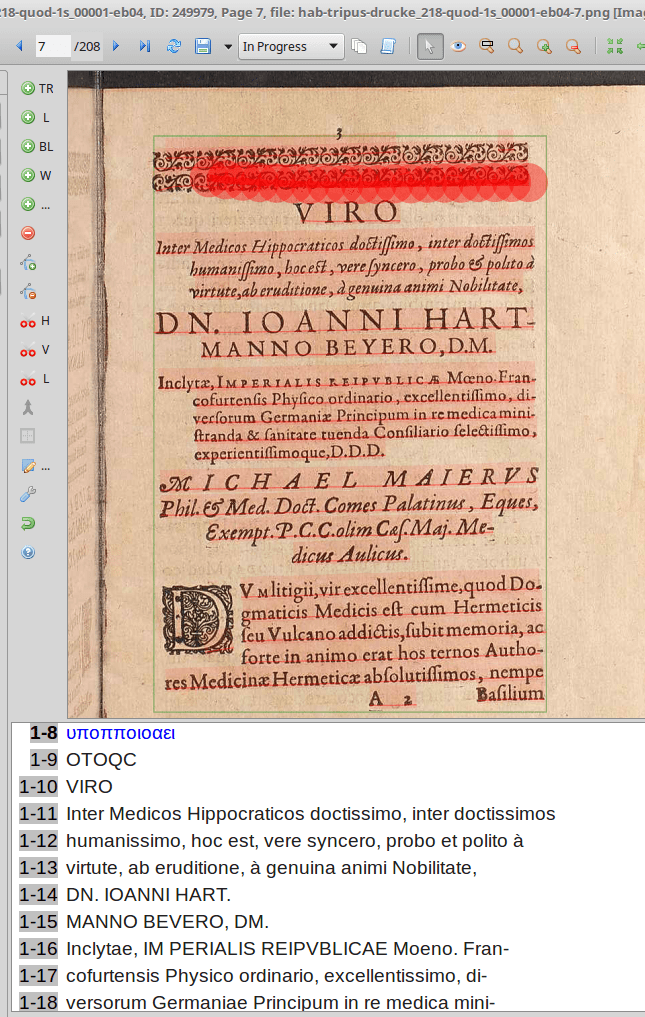
As you can see, the results are pretty convincing. At least if you ask me. If you want to hand-transcribe all of this, go ahead. But I’m lazy. Why else would I have started working with computers? 😉
Important: Having the right model for your data
My results for the Latin texts were achieved using the model generated in the Innsbruck NOSECEMUS project and the Wiener Diarium model for the German ones. The Wiener Diarium model causes my ‘und’ to be translitterated as ‘ond’ because this was the translitteration rule in their data. It is incorrect for mine, but can be searched-and-replaced easily. Generally, your model will ‘follow’ the transcription guidelines from the model, so it might do some stuff in a way that you wouldn’t. Mostly, this can easily remedied with search and replace. However, if the information you want was already lost in the process (such as using the exact glyphs from the historical document when they were ‘simplified’ or ‘normalized’ in the model), you’ll have to hand-correct probably. Otherwise, the models are so great, they can read my texts better (and faster) than I can. Honestly! (I also have to admit that I am not the best reference for expertise in reading old fonts 😀 If you are super good at this, Transkribus probably would not be better than you because it is a machine, after all, and Humanities type data have lots of inconsistencies.)
EDIT: I am also happy to inform you that I heard from the ‘creator’ of the NOSCEMUS model, Stefan Zathammer, that the model has been made available to all users (in an expanded version, called “Noscemus G(eneral)M(odel) v(ersion)1”), making 16th to 18th century print easily and quickly machine readable with very little mistakes! (Info ’15/12/2019: Noscemus Transkribus Model released’) So, let’s get transcribing, I’d say 😉 And thanks so much to Transkribus for providing these super useful tools – us early modernists love you 😉
If the models available don’t really fit your needs (i.e. the results are crappy), you either need to get another model which might work better or you can train your own model if you already have a few pages of manual transcription it can learn from. Please consult the official documentation for this, since it wasn’t necessary for my purposes and I consequently have never done it myself. To get additional models, contact the Transkribus team.
Conclusion
This is it for today. I hope you enjoyed it can can use my tips or maybe just learned enough about Transkribus to decide whether it might be useful for your purposes. This tutorial is not actually meant as a ‘review’, I wasn’t asked to do this and am not officially affiliated with Transkribus. But I love their product and their services, have achieved great results with it and have received great support, so this is also a way of me saying “Thanks!”. If you want more info, there is a much larger base of documentation and tutorials available “from the source”, but I personnally found that the Transkribus documentation is a bit too detailed for me since I only really want to use a very limited amount of their functionalities. I really only need and use the steps presented in this tutorial. It helps me generate transcriptions for lots of print text. I love it!
To be fair, I also wanted to mention that, of course, there are other tools for such purposes. A very promising one is OCR-D, a project with the goal of improving OCR for historical print. This would actually be more apt for my purposes because Transkribus was initially geared more towards manuscripts. Not to shame anyone, I met some of the OCR-D employees at a poster presentation and they were nice – but they never replied to my inquiry email whereas Transkribus’s support was amazingly good, kind and helpful. The software does what I want. So I totally recommend Transkribus as my go-to tool.
If you want to learn more about the Software or want help from the team (on issues like “How do I include the costs for a Transkribus support in a grant propsal?” etc.), probably best contact: email@transkribus.eu
If you find errors in my tutorial, please let me know and I’ll fix them.
Best,
the Ninja
PS: If you know German, you might like this tutorial as well. Transkribus are also working on many other features (such as Keyword Spotting) which are not part of this tutorial, so feel free to check them out! And also check out the review / tutorial from Mittelalterblog which covers some stuff I didn’t.
Buy me coffee!
If my content has helped you, donate 3€ to buy me coffee. Thanks a lot, I appreciate it!
€3.00

6 thoughts on “How to historical text recognition: A Transkribus Quickstart Guide”