
Using photogrammetry to obtain 3D models has become one of those ‘hot topics’ lately. For that reason, I wanted to give a short tutorial of how you can get a simple model. It explains everything from how it works, how to take pictures, get software to assemble the model and introduces the terms and software involved that you should know to have a good overview.
Almost exactly a year ago, on my Christmas holidy, I took pictures of one of my favourite places ever, the Cathar fortress Montśegur Castle. I wanted to give you an SFM tutorial ever since, but they’ve been lying around for a year now. You can get them for this Christmas at least 😉
What is photogrammetry?
This process in question is also called Structure from Motion (SFM). Well, I don’t need to do everything myself, so I invite you to read the Wikipedia definition:
There are many variants of photogrammetry. One example is the extraction of three-dimensional measurements from two-dimensional data (i.e. images); for example, the distance between two points that lie on a plane parallel to the photographic image plane can be determined by measuring their distance on the image, if the scale of the image is known. Another is the extraction of accurate color ranges and values representing such quantities as albedo, specular reflection, metallicity, or ambient occlusion from photographs of materials for the purposes of physically based rendering.
Close-range photogrammetry refers to the collection of photography from a lesser distance than traditional aerial (or orbital) photogrammetry. Photogrammetric analysis may be applied to one photograph, or may use high-speed photography and remote sensing to detect, measure and record complex 2D and 3D motion fields by feeding measurements and imagery analysis into computational models in an attempt to successively estimate, with increasing accuracy, the actual, 3D relative motions.
From its beginning with the stereoplotters used to plot contour lines on topographic maps, it now has a very wide range of uses such as sonar, radar, and lidar.
As you can see, the term photogrammtery actually desribes a range of processes. If we look at the Wikipedia definition of Structure from Motion, we can see that it’s much closer to what we actually mean:
Structure from motion (SfM) is a photogrammetric range imaging technique for estimating three-dimensional structures from two-dimensional image sequences that may be coupled with local motion signals. It is studied in the fields of computer vision and visual perception.
So essentially, we can say that we take lots of pictures of a certain quality, respecting certain criteria, so that they are optimal for a computational model to put the 2D back into a 3D structure. As a measure of experience, any point which is supposed to be in the model should be on 5 pictures. So you’re already getting the feel of just how many pictures you are supposed to take to successfully create a nice model.
Getting a feel for taking the pictures
Really simple models can even be done using photos taken from your mobile (also see these two tutorials using mobile pictures: 1|2). The QClone App allows you to try out photogrammetry with your phone using any sort of object you have available. The app will guide you through the process by making sure you take enough photos. For getting a feeling for that, maybe really give the app a try. The free version lets you try out everything but not export the model, so don’t make it unnecessarily perfect 😉
Never move the object, even if it’s small and moveable. It will confuse the software. Make sure to get the object at least from three different positions. Generally, you can make a model from black-and-white as well as colour pictures. However, the colour is actually additional information which can be used by the algorithm, so mabye better take colour pictures.
The first thing to take into account when taking pictures: Are you allowed to take pictures? For private use only or are you allowed to share them as well? Be careful, especially if you are a researcher in this field, it could create problems for you in the future if you illegally take pictures and share 3D models. Know your rights!
Taking photos with a somewhat ‘good camera’
If your object to be modelled is outside, make sure you get even lighting. Meaning too much sun will cast shadows etc., but the lighting should be the same for all angles, if possible. Keep exposure and focal length the same in your picutres (40-60 fixed) and also try to keep the same distance from the object. The software needs to get every point from different angles, but that doesn’t mean you should tilt your camera – that will give you background blur which you don’t want. You want even depth of focus and sharpness all around in your images. The different angles automatically come from you moving around the object, taking overlapping pictures of the same points from different angles, so no tilting the camera necessary.
As for the distance: the further you get away, the less sharpness you will get with worse cameras. This can be easily compensated for though. If you need detail but have to compensate for a non-perfect camera, make sure you never take a pictures that is bigger than an A4 size paper. Get close (for that, the camera already needs to be ok-good but not pro-good) so that you could fit around one A4 size paper sheet maximum on one / per photo. If you stick with this advice, you are a) forced to take enough pictures for a good model and b) will have enough detail. Remember that each point of your model needs to be on five different photos, so when moving around your object, don’t be hasty. Take lots of pictures with tons of overlap! (Make sure to bring a big enough SD card, switch your settings to RAW and a decent image size, or at least JPEG fine. However, also note that you’ll need some computing power to process this later, so you might need to compromise).
Some tech specs for the photos:
- get low ISO, that means less noise. ISO 100, if very dark max. 400.
- aperture: depth of field, f8 or higher (better 11); landscapes f5.6-8.0; automatic shutter control, auto-focus.
- quick shutter speed to avoid motion blur
- avoid flaring and zooming, as well as under- or over-exposure
- no flash, careful with uneven lighting or shadows
- ca. 100 pictures for an object the size which you can easily carry away, if it has overlaps (such as handles): considerably more
- 8 pixels per point in the model, point on at least 5 different pictures
- good photos are important – for basically any photgraphy-related topic (like I mentioned in this post already), no image manipulation can really make up for you taking a bad picture!
- don’t have too much zoom or shaking will have to big an effect – if you can keep the camera still, shutter 1/125 – if not 1/160.
- I hope I translated all the photography-related terms correctly, please inform me if you find mistakes!
- Also beware that you can (and will to a certain degree) generate SFM ‘artefacts’, i.e. some ‘waviness’ in your model or incorrectness, like in the example of handles. The model, after all, is not reality (!).
Convert your pictures from RAW to lossless jpg or png later, but be sure that your program keeps the metadata (my linux commandline discards them if I don’t do it right!) because Agisoft can use these to add to the calculation and you’ll get a better model. A surefire way is to use Adope Photoshop to convert, if you have it, because it has a quite failsafe menu for you to pick the options you like.


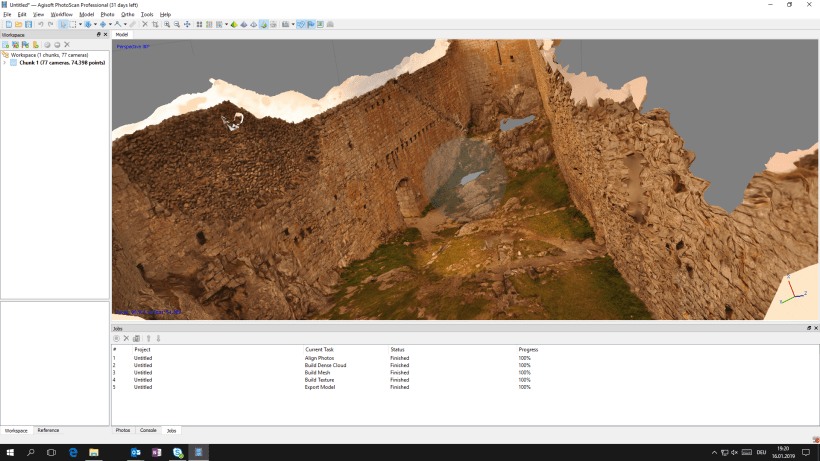
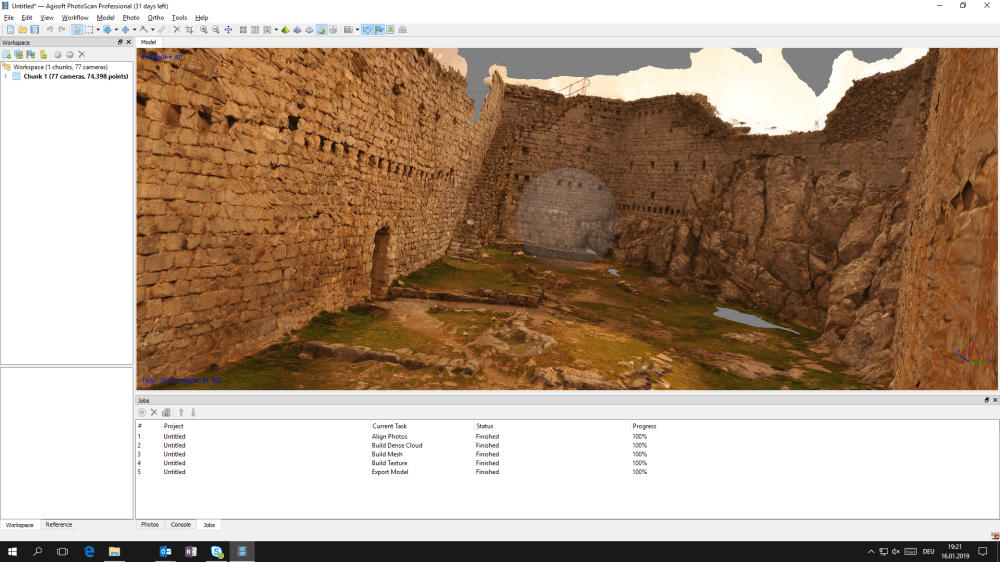
These are some of the pictures used for my example model, so you can get a feel what model comes from what pictures. In total, I only took 77 pictures. So the texture of the model looks quite nice but there wasn’t actually enough information for a good model (“behind the scenes” if you switch off the texture).
As you can see from the pictures illustrating this post, there are a few gaps in my model. This is because apparently, I didn’t get all the spots from the castle on my photos. Especially some at the floor are missing. I would have had to walk around a little more. But then again, hey, I only took 77 pictures for this model. And it’s quite a big casle, so I feel this was quite successful as a just-for-fun model. Also, obviously, I only have the inside of castle. If you zoom out, the outside will just be some weird structure. Only that will be on the model which you actually took the time to take detailled pictures of. Kind of logical, but easy to forget.
Creating the model
I will give the examples now with Agisoft Photoscan but, of course, there is also freeware available to do just the same.
Loading photos (and masking)
So you open Agisoft and load all the pictures you want to use (make sure you enter your trial license first, or you won’t be able to save the model afterwards!). In my case, these were all I took in the portrait mode. You don’t want to mix portrait and landscape mode. This process is called “Add photos” in Agisoft, in case you couldn’t find it.
Now you could start by marking the parts of the photos which contain your objects. This is a very time consuming process, but eliminates noise straightaway. Depending on your objects, you can also just run the alignment process and then use a software like Gigamesh (see below), which will remove the noise around it. However, you can’t be sure if it will be exactly correct. So if you insist on perfect accuracy with this, do the masking first. In my personal environment, I have made the experience that the archaeologists tend to only clean afterwards, whereas the museologists mask first. You can look up how to do this, there are many tutorials. I for one am too lazy for masking 😉 You will therefore notice some noise around the corners of my example model that I didn’t bother cleaning up.
Align the photos
Well, now the photos are in and masked (if you want to do that), you start the ‘align photos’ process. This means that the software will try to recognize matching points on the different photos (“detect points”).
Build the point cloud
Building the Dense Cloud is quite intense computing-wise. Everything happens in the cache and it might crash once spaces runs out. You can put everything else on ‘high’, but don’t do it with the dense cloud. But maybe if your model isn’t very big (like with fun projects), you can still try to go for ‘High’. Worked for me in some cases, but ‘Very High’ has never worked for me thus far. It’s up to you if you’re ready to let this thing run for hours only to crash 😉 But try it out, I say.
All the points which were previously matched on the different photos will be put into a what’s called a ‘point cloud’. In the mesh, these will be “meshed” into triangles. So we connect 3 points into a triangle because 3 points is the minimum requirement for generating not only lines, but planes. And lots and lots of those planes combined together create a 3D object with a surface. But really, the computer only has the points, the mesh / triangle system is created only by linking these points together.
So once the point cloud exists, you can build the actual model. The texture will be added on top of these surfaces created by the triangles. However, if you’re only interested in the surface, you can skip the texture alltogether. Most people like it because it really makes your result look nice (see my examples). But the scientifically interesting stuff is in the mesh.
Recap of the workflow
Align > Dense Cloud > Mesh > Texture > Export.
So after aligning, you build the build dense could. (In the settings, there are some tweaks you can do to reduce computing power for the dense cloud without actually losing anything relevant.) To speed things up with less data and lower expectations, you can also align and build a mesh from depth maps. Then texture, then export.
Use ‘Medium’ in Agisoft for ‘Align photos’. Go for ‘High’ with ‘Build Mesh’. Export as .obj with .jpg texture and no vertex colours.
Oh, and of course, once you want to do analyses, you need your data to be scaled (!) so you know, for example, how big the edges are you want detected. Don’t forget this step as it might not happen automatically!
A short note on 3D file formats
There are many different 3D file formats because you can store 3D data in different ways. Many formats are proprietary as well. I am not the greatest expert on this, so I’ll only give a short glimpse into the world of 3D file formats. From Agisoft, you can easily get an .obj(Wavefront OBJect) with an additional .mtl file.
The .ply data format (“Polygon File Format also known as the Stanford Triangle Format.”) is quite easy to make sense of and stores 3D points as follows: First a header and metadata, then the coordinates. .ply data is like a table with 5 columns: x, y, z, colour and function value (like what you might do in GigaMesh later). .wrl data is much bigger and writes actual coordinates, thus many geo-referenced things are done with .wrl.
The mesh is the structure, the texture is just ‘images placed on it’. Texture can even make a pretty shitty model look quite good.


Going further: What to do next
Well and then, of course, the fun only starts. Now you need to choose what to do with a model. The really good models you can find online (such as the British Museum models) were done with great cameras, taking lots of pictures and then manual editing to make them as good as they are now.
Also, there are different challenges depending on the type of object you want to model: Is it a castle, a landscape, a badly lit church interior, a small object, minute writing which is supposed to show up in the actual model (not only the texture – you can’t do calculations such as making writings more readable using edge detection in a texture – for that the data needs to be in the actual model). Especially difficult are objects like ceramic vessels with handles and the like because you need to take the pictures in a way that the model ‘gets’ that there is a small 3D structure attached to the bigger one. Maybe don’t use something like that for your first tries.
Depending on your use case, it might be necessary to get a 3D scanner. There are hand scanners which are available at reasonable prices, however, with photogrammetry, reasonable pricing also always is a compromise in quality. Also, there are many related techniques for the smaller or bigger scale (such as lidar), or computer tomography. Or research the Heidelberg RTF method (2.5D).
What do you want to do with your model now? Share it on Sketchfab or 3D print it? Run analyses over it using GigaMesh? If you upload to Sketchfab, you can also play around with lighting ( > 3D Settings) and you can even add annotations to your model. It’s all up to you!
You might also be interested in this post I contributed on another blog. It also has a “What to do with my model?” section with some practical examples (for both research and science communication / public engagement purposes).
Oh, and if you want to go on with this, or other 3D stuff like AutoCAD – get a mouse. I’m doing this stuff using my laptop where I can’t scroll. It’s incredibly difficult, sometimes even impossible to get to the positions you want. So don’t be lazy like me, go and find the mouse.
This is our example project on Sketchfab.I added a few annotations which explain which parts of the model are noise, where there is a gap, etc. Mostly to illustrate that you can make annotations in Sketchfab which might be relevant for you in scholarly contexts. However, it doesn’t have all the texture. This is maybe helpful to illustate that nice texture (such as in the images illustrating this post) can make you believe your model is really good, but when you take away the texture (which is somewhat of an illusion), you realize the information isn’t really in the model. This is ok if you want to add the texture anyway, only want to show the model off, but no need to make any calculations or analyses based upon it. If you want to have texture in Sketchfab, be sure to embed texture before saving and uploading your model!
What is modelling anyway? A primer
A general principle of modelling comes into play here: A model is an abstraction of realtiy. It shows only certain chosen aspects of a real-world entity. If you did it right, it shows these important elements really well so the abstraction makes them easier to analyze. But that also means the model might only be good for the one specified purpose. Such as there is no general-purpose chemical or textual analysis (you always have to analyze with a particular research question in the back of your head), there is no general purpose 3D model either. You need to know your purpose before making the model so you can be sure all the relevant data is actually in your model.
A model is not an exact replica of the real-world entity it represents. It’s an abstraction. There is more information in the sum of the pictures you took than there is in the model, such as there is more information in the real-world than in your pictures. You can ever only take a picture of one aspect of this entity. The 3D model, even though it seems “like a real thing”, is a reduction of information. Don’t forget this! And also, the way you create the model, of course, influences how your reality is depicted in it!
Software to know
Sketchfab is an online platform which allows you to share 3D models (= publication and annotation).
Blender and Unity are 3D modelling softwares. Blender is like Photoshop for 3D, free and open source. Unity has a free trial.
Agisoft / Metashape, they are two different names for two different versions of the same software. You can get a 30 day free trial. It’s linked to your computer apparently, so if you want to use it multiple times, you might need to reinstall and use a different email-adress 😉 Not that I would ever recommend such a thing. Other than that, there are two licenses. The professional for around 500€ and a cheaper one for 80€. Make sure to wisely install it on your computer with the most computing power as this will determine the quality of your results. If you want to make bigger models and have very little computing power, there are some workarounds / Python scripts to chunk the process. But still maybe don’t invest in the 500€ version if you have a really bad computer. Computing power can also be
The Gigamesh software is free. It’s not for creating the model, but it has great options for doing things with the model afterwards, such as analyses of all kind which is probably a relevant use case for you if you want them for scientific research purposes and not ‘only’ sharing or making museum objects available digitally or the like. There are some very helpful tutorials available. It runs on Linux, but has a Windows Beta version now as well. The software can use multiple graphics cards to do calculations if you have them / the right software architecture and there also are some scripts which are only available in the commandline mode. It’s research software coming from a bunch of research projects, so usability is not that great. You need to find the few functions you really need and just remember wehre to find and how to use them basically 😉 Use GigaMesh’s Clean button to clean up noise if you didn’t mask your photos.
Meshlab lets you do lots of post-processing playing around.
Honourable mentions:
- Metigo – georeferencing
- C++ OpenCV has an SFM module
That’s it for now – happy modelling to you!
Best,
the Ninja
PS: I hope this is useful. Some parts have much more detail than others, but I thought the post was already quite long and time-consuming to write, so I decided to stop here for now.
PPS: You might also be interested in this guest post on the IEG Mainz DHlab blog which quickly deals with the question of what you can do with 3D models generated from photogrammetry: Sarah Lang, “DH fun on the road: 3D models from your photos using photogrammetry,” in Digital Humanities Lab, 23/09/2020, https://dhlab.hypotheses.org/?p=1650 .
Buy me coffee!
If my content has helped you, donate 3€ to buy me coffee. Thanks a lot, I appreciate it!
€3.00

Thank you for this interesting blogpost. I have one issue with viewing the model in Sketchfab though: when clicking on any of the annotation buttons, the view automatically zooms in so that I can’t read the annotation. In order to read it, I have to zoom all the way out again until the annotation window comes into view (while being careful not to move the model around, which makes the annotation window close again). Is this a known bug in Sketchfab, or am I doing something wrong?
LikeLiked by 1 person
I think it’s probably me not having configured it correctly. I think I added the annotation while the model was in a weird position and now, once you click on it, it zooms back into the bad position from which you can’t see anything. I’ll see if I can fix it.
LikeLike
Should be fixed now, thanks for the hint!
LikeLike