
Annotation is a fundamental part of the DH. But often, us DH people don’t actually do the annotation. We do the transformations. For many of us, it’s the collaborators from the subject discipline of the project who provide annotations. Annotation can be tedious work. Some of it can’t be automated. But some definitely can. Here’s how.
It doesn’t have to be Python: Auto-annotating XML from within the environment
Of course, we have all learned how to annotate XML data by hand. But, if you’re like me, most of your classes were either annotating one short example to learn an XML standard or learning XSL transformations. Many digital humanists aren’t confronted very often with the tedious task of annotating tons of data which is completely raw and annotation-free. Data correction and ‘deepening’ the level of annotation is a task often given to student assistants. So not all of us have ever seen ourselves confronted with the need to learn techniques for effective annotation. We all know, of course, that some automations can be done using a programming language such as Python. But we needn’t even look that far. The goodies are so close, we sometimes say in German (or something like that 😉 ).
“Warum in die Ferne schweifen? Sieh, das Gute liegt so nah!” (German saying modelled after a poem of Johann Wolfgang von Goethe)
In this post, I will show you two techniques which can be used right from your favourite (Oxygen?) XML editor, such as regex-powered search-and-replace, or even from within an XSL transformation, using <xsl:analyze-string>. The post is generally more or less beginner-friendly (especially trick no. 1), but requires basic knowledge of XML. Trick no. 2 requires basic command of the XSLT language.
Trick I: Regex seach-and-replace
When we press CTRL+F, a search window opens. You probably already knew that. But did you know that the Oxygen XML supports regex search-and-replace? (And, as far as I know, many free alternatives do too!) Or, were you aware but never really knew how you could put this great asset to use? Let’s get to it.
Imagine we have a text where we want to annotate Named Entities, so if we follow the TEI, <persName>s and <placeName>s. We also might want to give them an @ref attribute to link to an @xml:id (which might be in the header or something).
Further resources [in German]: my teaching video TEI-Annotation in Oxygen XML: Von den Basics zur Automatisierung mit regulären Ausdrücken on Youtube shows how to regex-search&replace on two more examples, restructuring Project Gutenberg texts by automatically adding in <head> and <div> elements as well as annotating personal names (regex part starts at around 10min into the video).
Use case: Tagging Named Entities
Please note, however, that this method is not one for detecting Named Entities. It will only annotate NEs which you have previously looked up and decided to put on your “to annotate” list. If you want detection plus annotation, using an approach with a programming language of your choice (such as Python or R) might be a better way to go. So before using this search-and-replace, make sure to compile a list of Named Entities you want to annotate and also list all possible forms they can appear as (such as plurals, genitives, only using the last name, etc.)
This approach is suitable if, for instance, you have a novel or play you want to annotate and there is a fixed group of regularly occuring Named Entities which you have already compiled of have access to. In other cases, you might want to try running your data through a Named Entity detection algorithm first (Recogito, an online-annotation tool, has this feature, for example). One you know which entities you want to find, if you want to do so ‘manually’, go and explore what different forms that person might occur as. For example ‘Sherlock Holmes’ will probably appear as ‘Sherlock’ or probably ‘Mr. Holmes’. You decide how many of these variants to include, but the general rule is that you should be as thorough as can be achieved in a reasonable amount of time. You can explore by search (normal search) for a substring for your name as this might turn up forms you hadn’t considered before.
So once you’ve complied this list, order them by compounded words and their sub-compounds, so for example, list ‘Sherlock Holmes’ before ‘Sherlock’ and ‘Holmes’. That is because if you try annotating something as ‘Sherlock’ first, you won’t easily be able to find the longer form anymore afterwards. Once you’re done, list them like this: (Name|Name2|Name3|etc.). Make sure that you don’t ‘layer’ parentheses or something, it should all be ‘on the same level’.
You could, of course, just achieve automated annotation of Named Entities using an XSL transformation, but using <xsl:copy-of> and all of that can be quite hard to grasp for a novice user, in my opinion. Seasoned users might want to do that. But for a newbie, using regex search and replace basically does the same thing, a little bit more slowly maybe, but it’s easier to understand. I teach this to complete novices and they have no problems annotating like this after a few minutes of practice. Understanding complex XSL transformation, however, is another matter entirely.
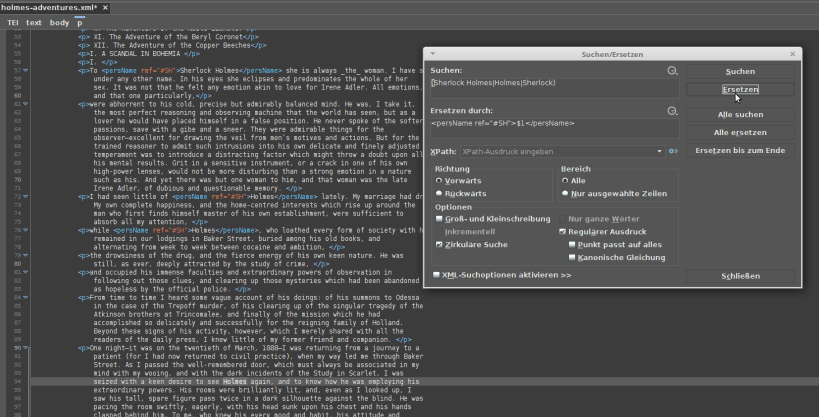
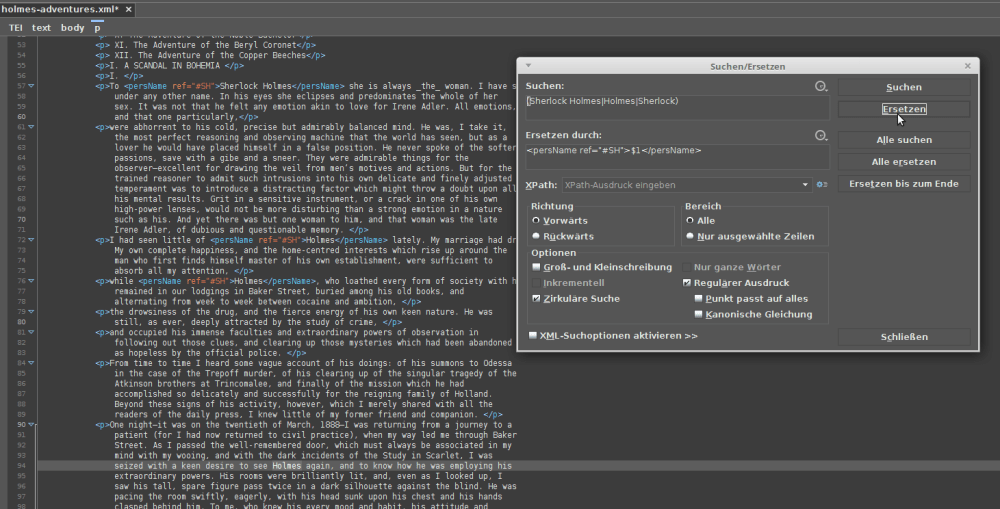
Turn on regex search and replace
Now it is time to paste this into the search field and turn regex search on in the search window. Don’t forget this step or horrible things might happen 😀 Never ‘replace all’ without checking your replacement on multiple examples first. Anyway, first click ‘search’ once and see it the match is good. Try the next few matches as well. Then we add the ‘replace’ phrase. Assuming you want TEI output, you might want to annotate Holmes as <persName ref="#SH'>Holmes</persName>. To achieve this, you can reference your finding (can be either ‘Sherlock Holmes’, ‘Holmes’ or ‘Sherlock’) as $1. With the dollar sign and a number, you can address a number of values from the parentheses above. This is why we don’t want multiple parentheses in this example, we want to be able to address all findings as $1. Once you get more familiar with using regexes, it might happen that you’ll want to strategically make use of more than one parenthesis.
In the ‘replace’ window, we type:
<persName ref="#SH'>$1</persName>
This will get us the tag and the same ref for all of our findings but ‘keep’ the name form which had been found in the concrete case. Try to replace one example and see if the result was ok / the desired output. Test multiple times. Once you’re more or less sure it works, go ‘replace all’. Maybe use XPath now to check if the results are all valid (//persName[@ref='#SH']). Since all three possible forms have the same @ref now, we can easily find them again. I’m assuming you have an @xml:id to go with this in the header.
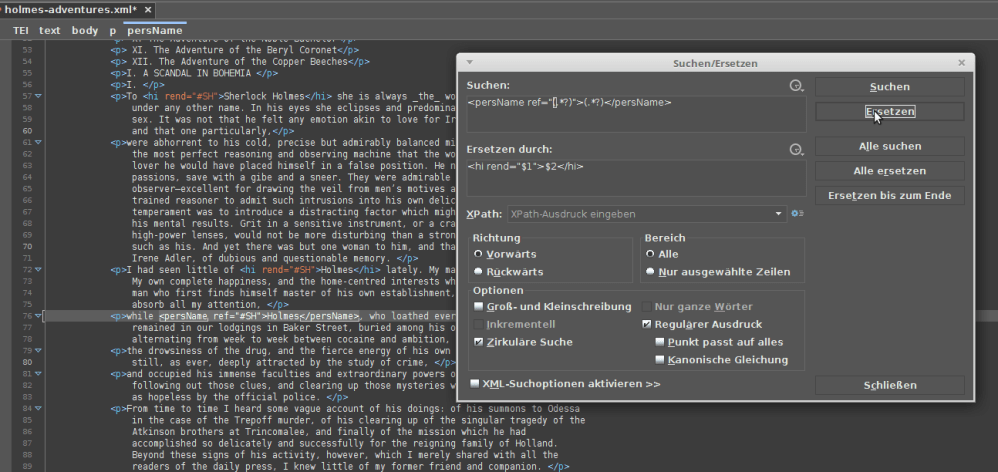
<persName>-elements to <hi> for whatever reason, yet keep the attribute value and the content (works for much longer content too, of course). This could, obviously, be done just the same using a transformation. Also, as you can see in this picture, the Project Gutenberg texts mark italics like _this_. They could, of course, be transformed into <hi rend="italic">s using regex.Use case: Retagging things which were tagged incorrectly
Maybe you made a mistake in your tagging and want to change the ref or realized that previous annotators made a choice you want to reverse. This can also be done using regex s’n’rp: For example to find one of your <persName>s: <persName @ref="(.*?)">(.*?)/> is searching non-greedly for the end tag. If you didn’t specify this as non-greedy, you could theoretically get back the whole rest of the document, which we don’t want. Only the shortest possible match. But I won’t go into the detailed workings of regexes in this post – maybe another time!
This can also be used for cleaning data. Say you downloaded a text as HTML and there are a lot of classes and links you don’t need. You can easily get rid of those using this method. Of course, there are other methods for all of these tasks, but when you’re already in your Oxygen XML environment, it might just be faster to know how to get some little corrections done here.
Use case: Tagging dates
A simple regex to find dates would be ([0-9]{4}) and replace by <date when="$1">$1</date>. This would give you {4} = four times any number between [0-9]. You can also rearrange your dates differently, so you’re sure to only match dates between 1000 and 1999, or whatever you want. You could also come up with a regex which will find you dates in different formats, such as, for example: 22 novembre 1992. The format is two digits, space, one word, space, 4 digits. You can translate that to a regex. If you want to have a detailled @when attribute, you could use <xsl:analyze-string> (see below) to check which name variants for the different months there are and react accordingly by replacing them by their number in the @when. But this is a more complicated task and I leave you to figure that out yourselves 😉 (can post about it if anybody’s particularly interested).
Use case: Correct superfluous linebreaks in Project Gutenberg texts
Project Gutenberg .txt files have lots of unnecessary linebreaks which (annoyingly and incorrectly) will result in <p>s in an OxGarage to TEI transformation, rendering the automating process gained from OxGarage pretty pointless. You can use regex s’n’rp to correct these Project Gutenberg texts to get rid of superfluous linebreaks before piping them through OxGarage.
If we translate what the unwanted linebreak looks like as a regex, we get to the following: (\w+)\n(\w+) That is at least one word (\w+), exactly one linebreak \n and then at least one word. But a paragraph ending is marked by two linebreaks ((\w+)\n\n(\w+)), that is one linebreak after the last line and then one to create the emtpy line separating paragraphs. So by getting rid of those single linebreaks, we are not losing our paragraph structure – yay to that! We replace the previous thing with $1 $2, thus replacing the linebreak (\n) by a simple whitespace. Now we can put the document through OxGarage and will get a nice TEI paragraph structure with hardly any work.
Use case: Turning <p> with chapter titles to <head>s
Search <p>(Letter|Chapter) (.*?)</p> and replace by <head>$1 $2</head>. To know if this is useful for you or will work for you – know thy data!
Using Word stylesheets (Formatvorlagen)
To speed up annotation even more, you could think about using Word stylesheets (useful when working with project partners who are a bit scared by XML data) and, most importantly, learning to navigate text using keyword shortcuts alone. Not having to ‘click around’ to move around saves tons of time on repetitive tasks. I can say more about keyboard shortcuts, give a more detailed crashcourse to regex and the like in another blogpost if you’re interested. Also, a tip regarding regex: if you’re an advanced user who knows regex from another programming language, beware that XSLT only supports basic functions. One time, during a class, a motivated student and I spent a long time researching why his elaborated regex didn’t work only to come to the realization that while this might be implemented in JavaScript, it just plain doesn’t exist in XSLT.
Summary
The downside of this approach is, that while quite powerful for editing one document or a one-time-thing respectively, it is quite repetitive if you want to process more than one document in this manner. If this is the case with your data, the second approach might be for you: If you write an XSLT stylesheet to do your annotating, you can subsequently use this one stylesheet on all your data (assuming that the data is similar and you want to annotate the same stuff. If not, making minor changes is not a big deal either).
Trick II: Using <xsl:analyze-string>
If you are considering using <xsl:analyze-string>, I assume some basic familiarity with XSL stylesheets on your part. This part will not be explained in detail now – if you are keen to learn more or get a more beginner-friendly walkthrough for this function, please let me know and I will follow up with it in another post 😉
In <xsl:analyze-string> you basically do the same thing as with the serach-and-replace, only that you put multiple parentheses into your regex. Depending on if a ‘find’ comes from parenthesis one (previously addressed as $1, now as regex-group(1)) or any other, different processing will happen.
Instead of the info below, where I replace certain entities for further processing in LaTeX, you could just insert different people to annotate. So the first parenthesis would be (Sherlock Holmes|Sherlock|Holmes) | (Dr. John Watson|Watson|etc.). Make sure that there is a pipe operator between the different regex-group()s!

<xsl:analyze-string> example from the post on getting LaTeX output from XML data using XSLT. It is important that in the ‘non-matching-substring’, we just print the text we had. Therefore, use this template as the last template in your stylesheet! Get the value of regex-group(1) using <xsl:value-of select="regex-group(1)"/>It is important that the match="text()" template is the last one in your list and it is also important that the template is configured to do nothing but the built-in behaviour of printing the text for any text which does not match any of the conditions!
We can even use XSL to generate an <xsl:analyze-string> environment to analyze our data from our data. However, this would lead to far for today. Maybe in another tutorial (if you are keen to hear about this, let me know!).
Thanks for all the fish!
Yours,
the Ninja
PS: I might make a cheat sheet for this and share it with you at some point!
Buy me coffee!
If my content has helped you, donate 3€ to buy me coffee. Thanks a lot, I appreciate it!
€3.00

Hi nicee reading your post
LikeLike